Introduction
Imagine you’re going to a remote place where you will have a super important meeting. If you’ll be late, it’s better to cancel the meeting early (when the airplane’s wheels get off) than letting the CEO or CTO wait for your arrival, annoying that you dare to disrespect them.
Still, it’s acceptable for someone to be late for less than 10 minutes. After all, it’s understandable that as a non-machine, it’s hard to be punctual every time. As a result, you wonder if you can predict whether you will be too late. Then, you can have as many not-too-late conferences as possible, that would be so great!
This project’s goal is to make this vision become a reality. I built a deep-learning model that can give you a suggestion about whether to cancel a meeting.
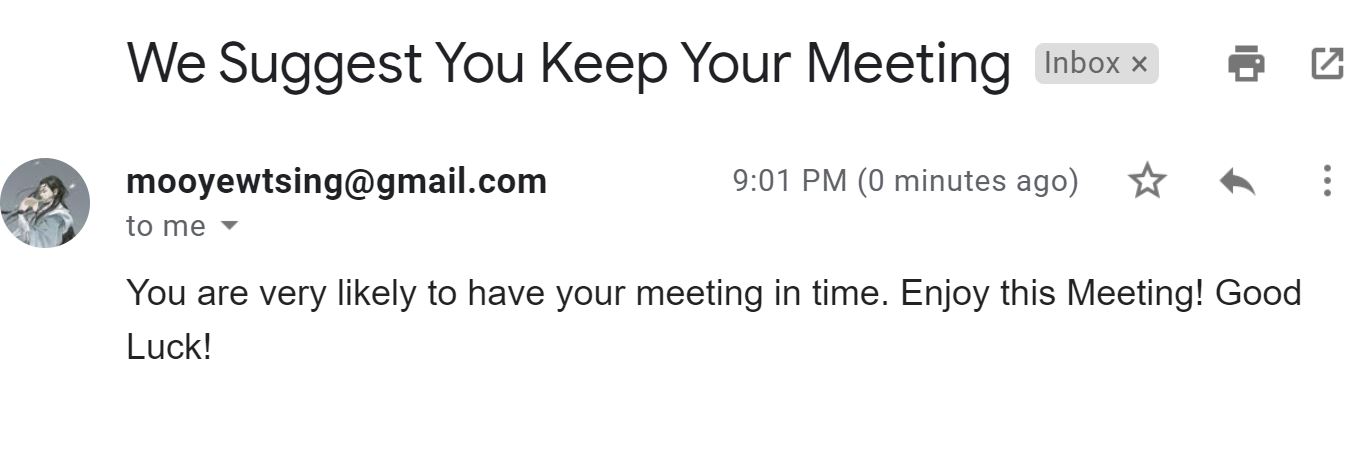
I know you may want to try it first. Here you go. (If you didn’t receive an email, which means the server on GCP is down to save my money, sorry.)
Main Problems
How to build an infrastructure that can automatically download and clean data monthly?
How to build a deep-learning model in a cloud environment?
How to deploy the model as an application?
Solutions I applied
(Go to https://github.com/YewtsingMu/airline_demo for a more detailed illustration)
I used the flight data in 2018 from Transtats. I leveraged the Google Cloud Platform to complete the tasks below:
- Build microservices that can automatically download and clean data monthly
- Batch download data of 2018 and processing them
- Randomly sample 80% data to build a deep-learning model
- Use half of the rest data to evaluate the model
- Deploy the model
Microservices achieve automatically downloading
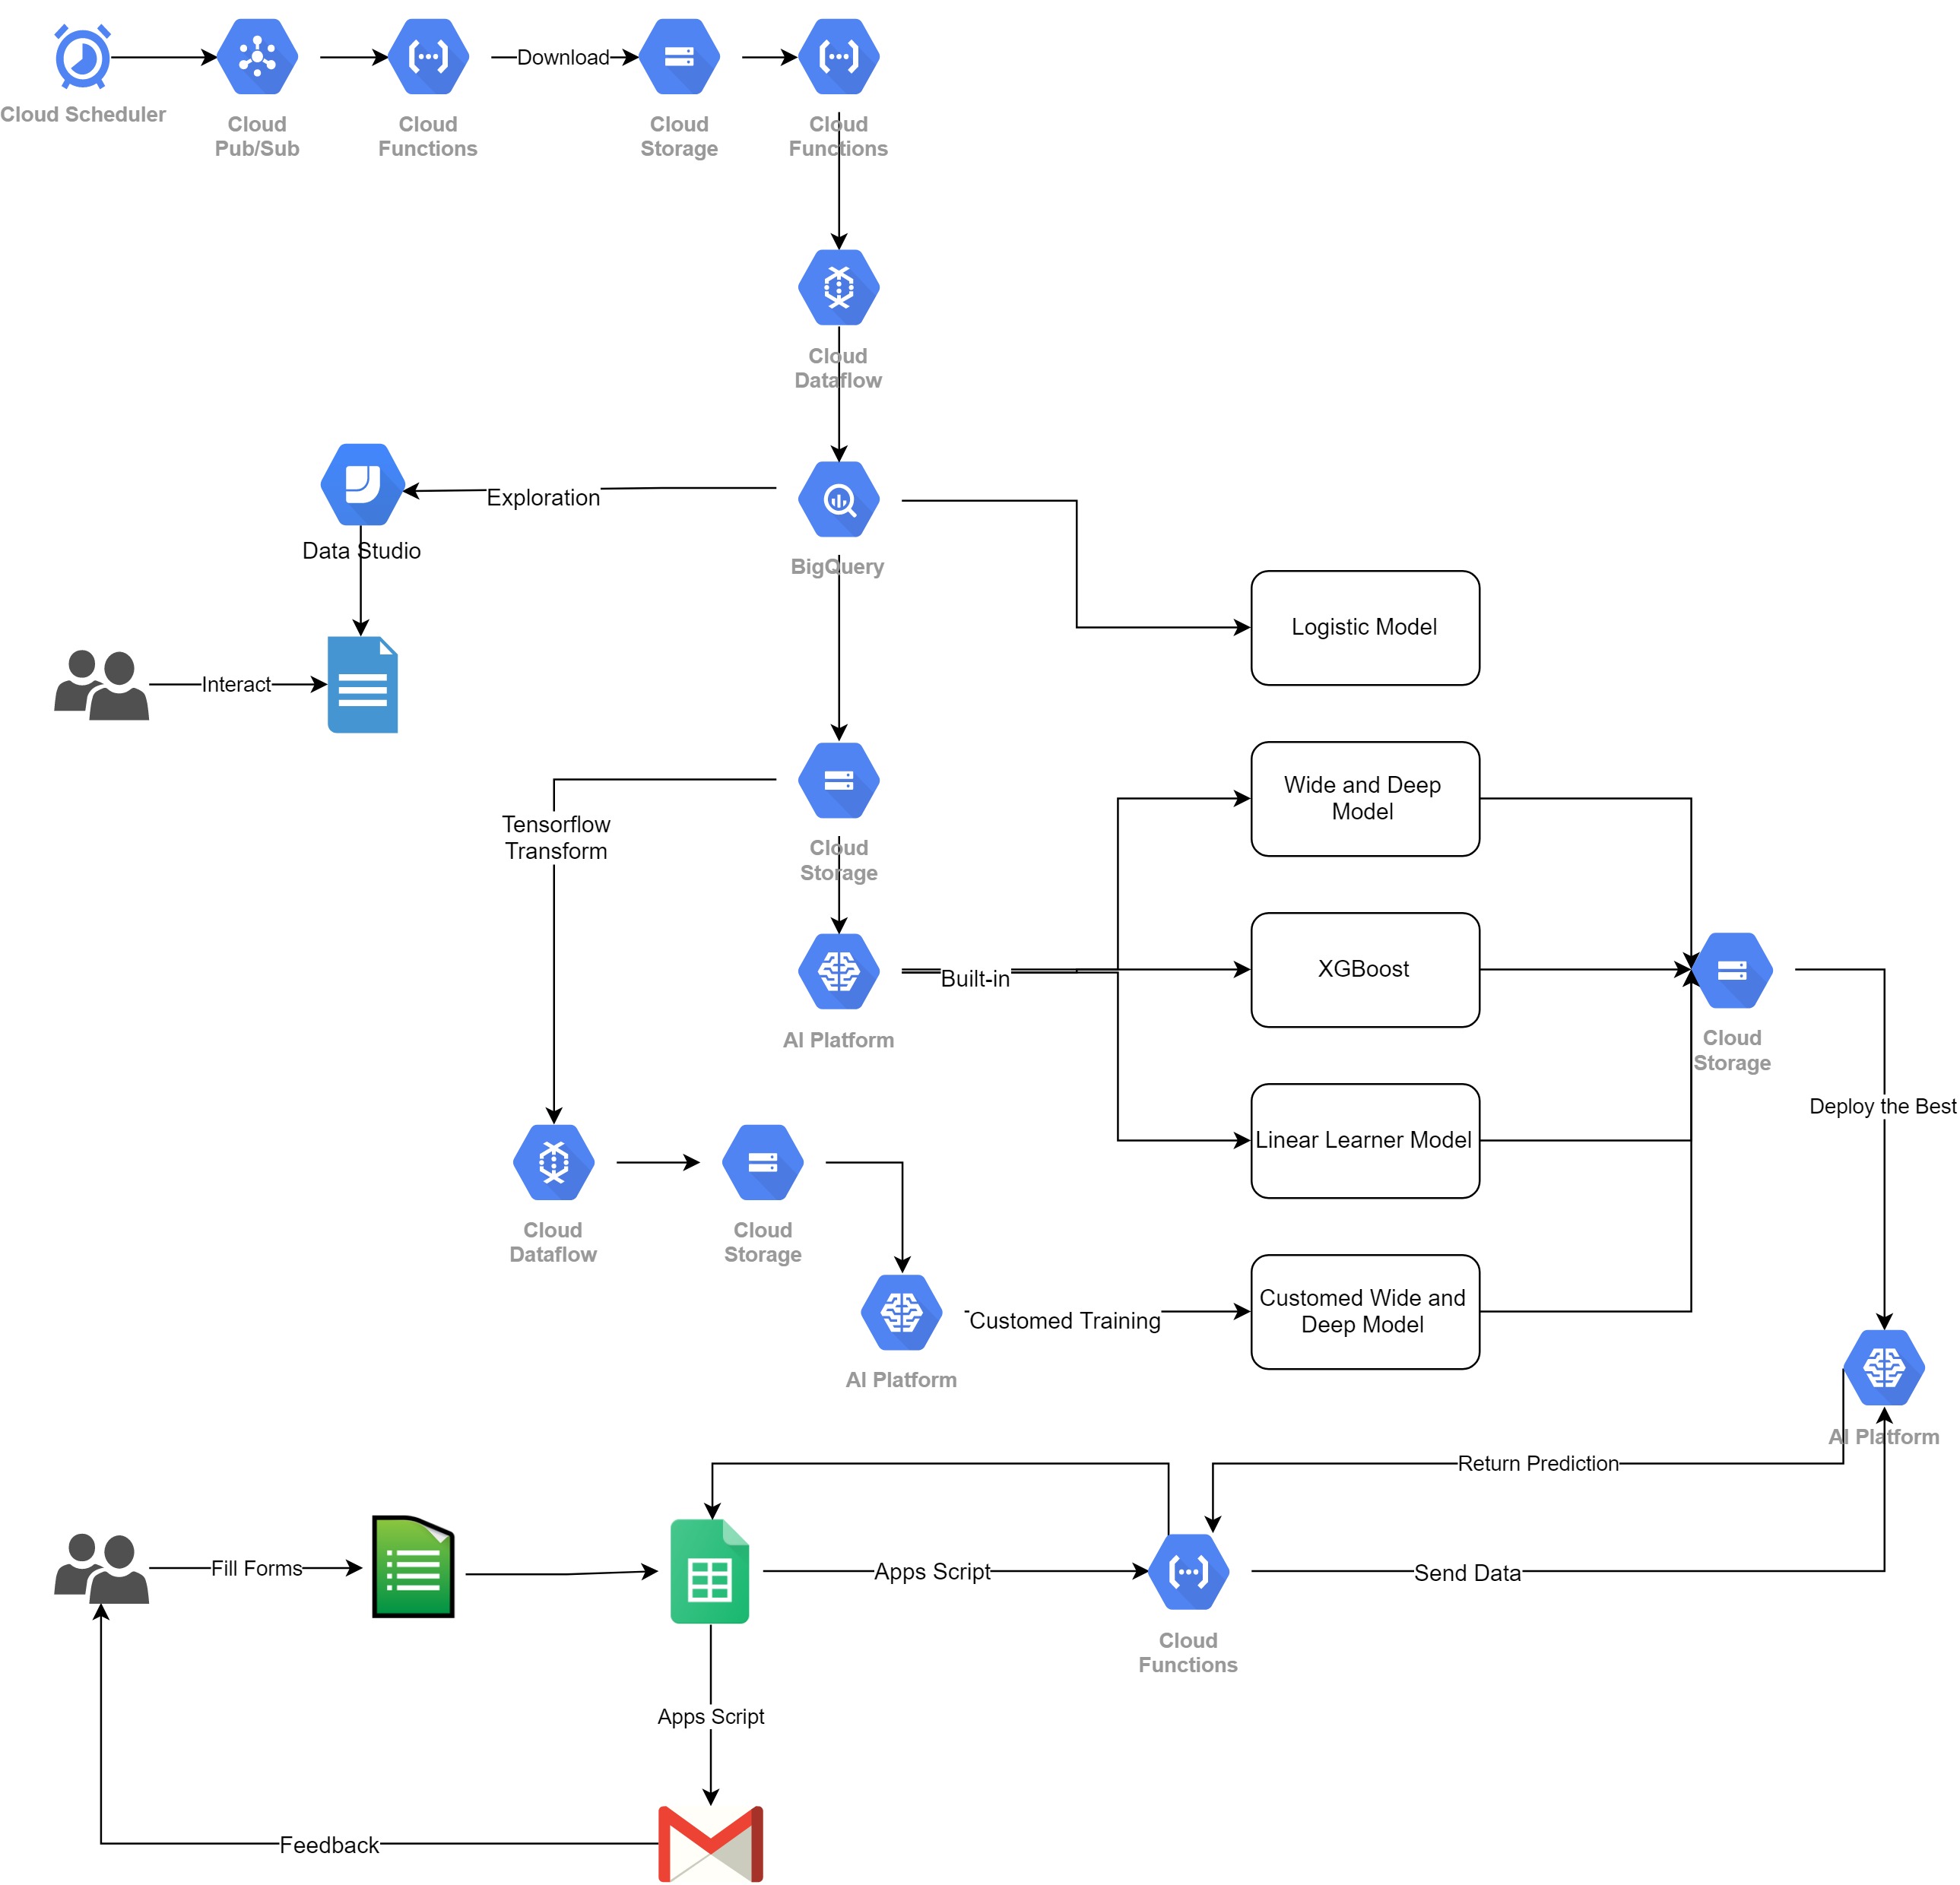
In this part, I prepared the data to train the goal model. Below is the diagram of this part.
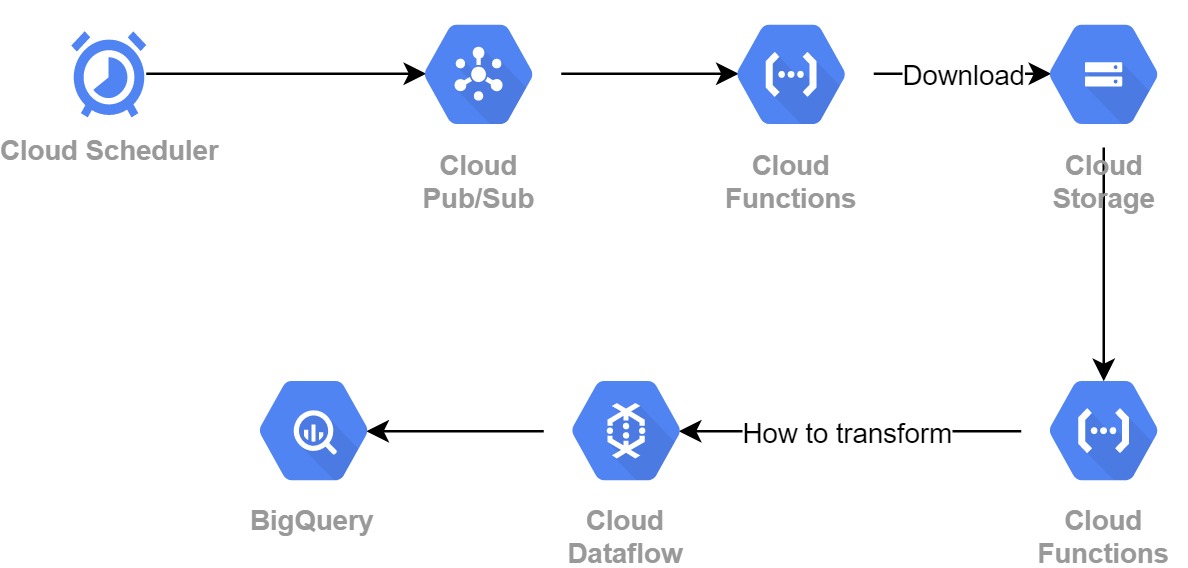
I used Cloud Schedule, Cloud Pubsub, Cloud Functions, and Cloud Dataflow as microservices together to perform monthly auto-downloading, processing, and saving tasks.
The Cloud Scheduler will initiate a message sending to Cloud Pubsub’s “monthly-reminder” topic. When the message comes, it’ll trigger a Cloud Function, downloading the latest monthly data from the Transtats, unzip it, changing the name, and save it as a CSV file to the Cloud Storage. When the new CSV file is successfully saved in Cloud Storage, it’ll trigger another Cloud Function, which will submit a job to Cloud Dataflow. Cloud Dataflow will then digest the new data, do some transformation, and finally, sink it into Bigquery, the data warehouse.
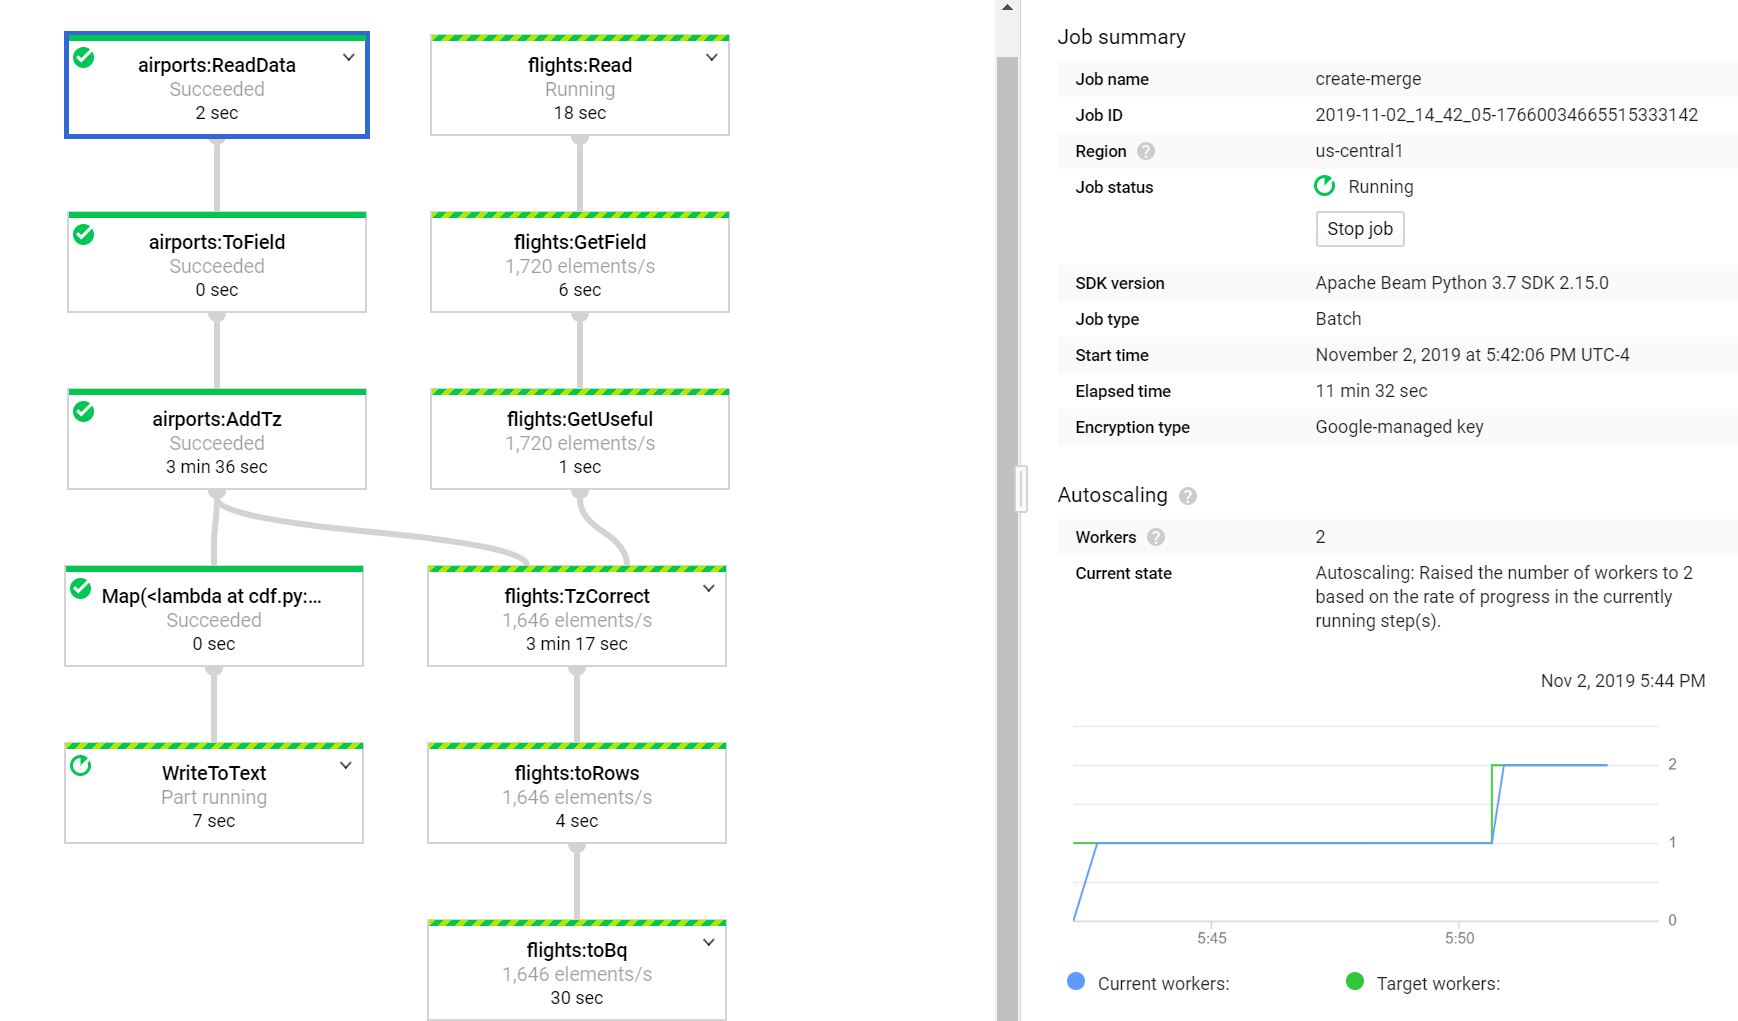
Cloud Dataflow – Data Preparision
Bigquery + Datastudio – Data Exploration
Bigquery is the data warehouse, and its cost is equivalent to the cost of Google Storage. As a result, the cost will not increase even if I store the data in this place to interact with the data.
What do I mean by “interact with the data”? In Bigquery, I can query questions I am interested in, like whether some carriers are more likely to have a late arrival or whether seasons can influence the flights’ delay. Besides, the data can be loaded into Data Studio, a visualization tool based on Bigquery.
Here, I show the result of my question below. The type of carrier, the season, the distance, and the locations have relations with the delay, which fit my intuition. (I know you will be more excited about something anti-intuition).

Moreover, it’s not a static visualization tool. When I say it’s based on Bigquery, I mean you can “query” data by touching these icons. For example, you can select a specific date range. All the visualization will change automatically as a result.
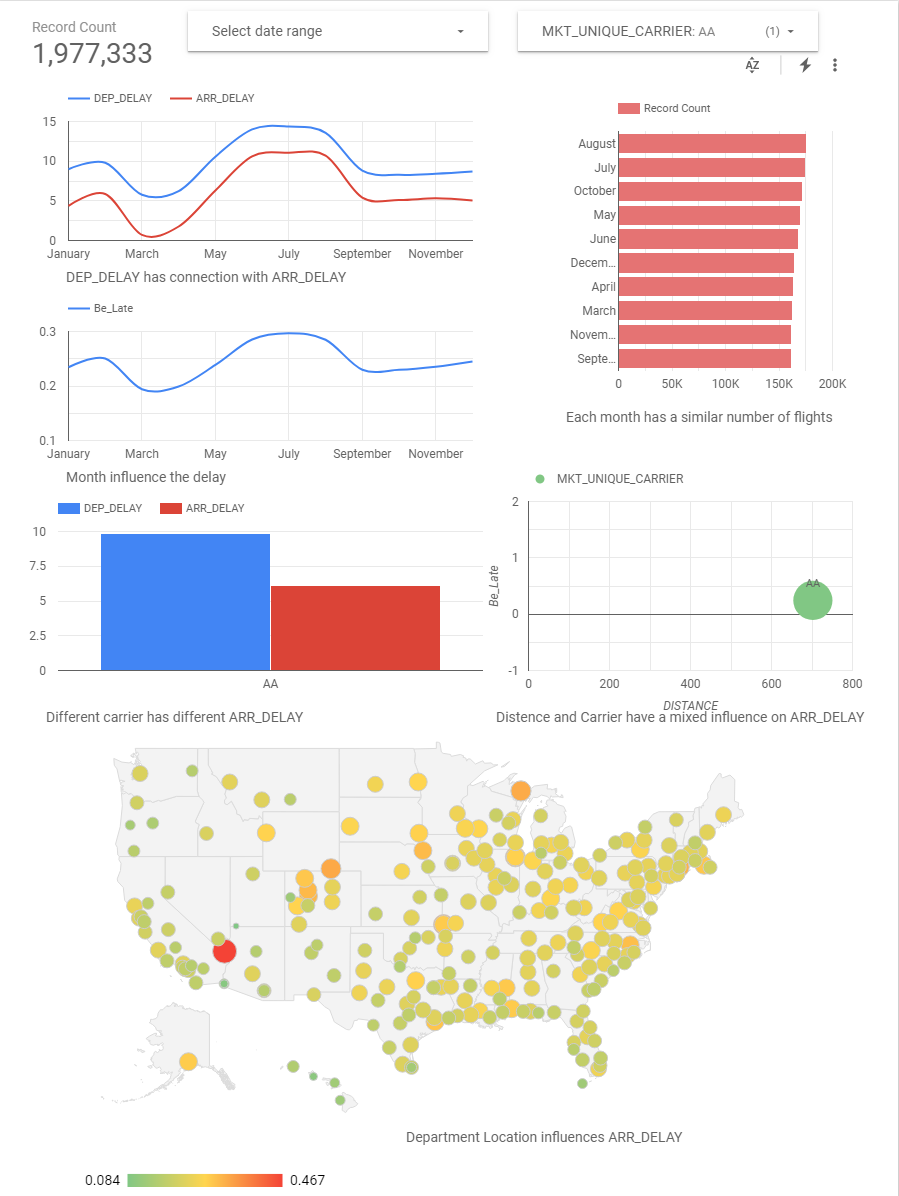
From the exploration in Data Studio, I notice that the carriers, locations, department delay, distance, and DateTime more or less can influence the delay of the flight. Therefore, I selected related features, including ‘arr_lat’, ‘dep_lat’, ‘dep_lng’, ‘arr_lng’, ‘DEP_DELAY’, ‘DISTANCE’, ‘hour’, ‘month’, and ‘MKT_UNIQUE_CARRIER’ to train a sophisticated model. But before that, let’s come back to Bigquery.
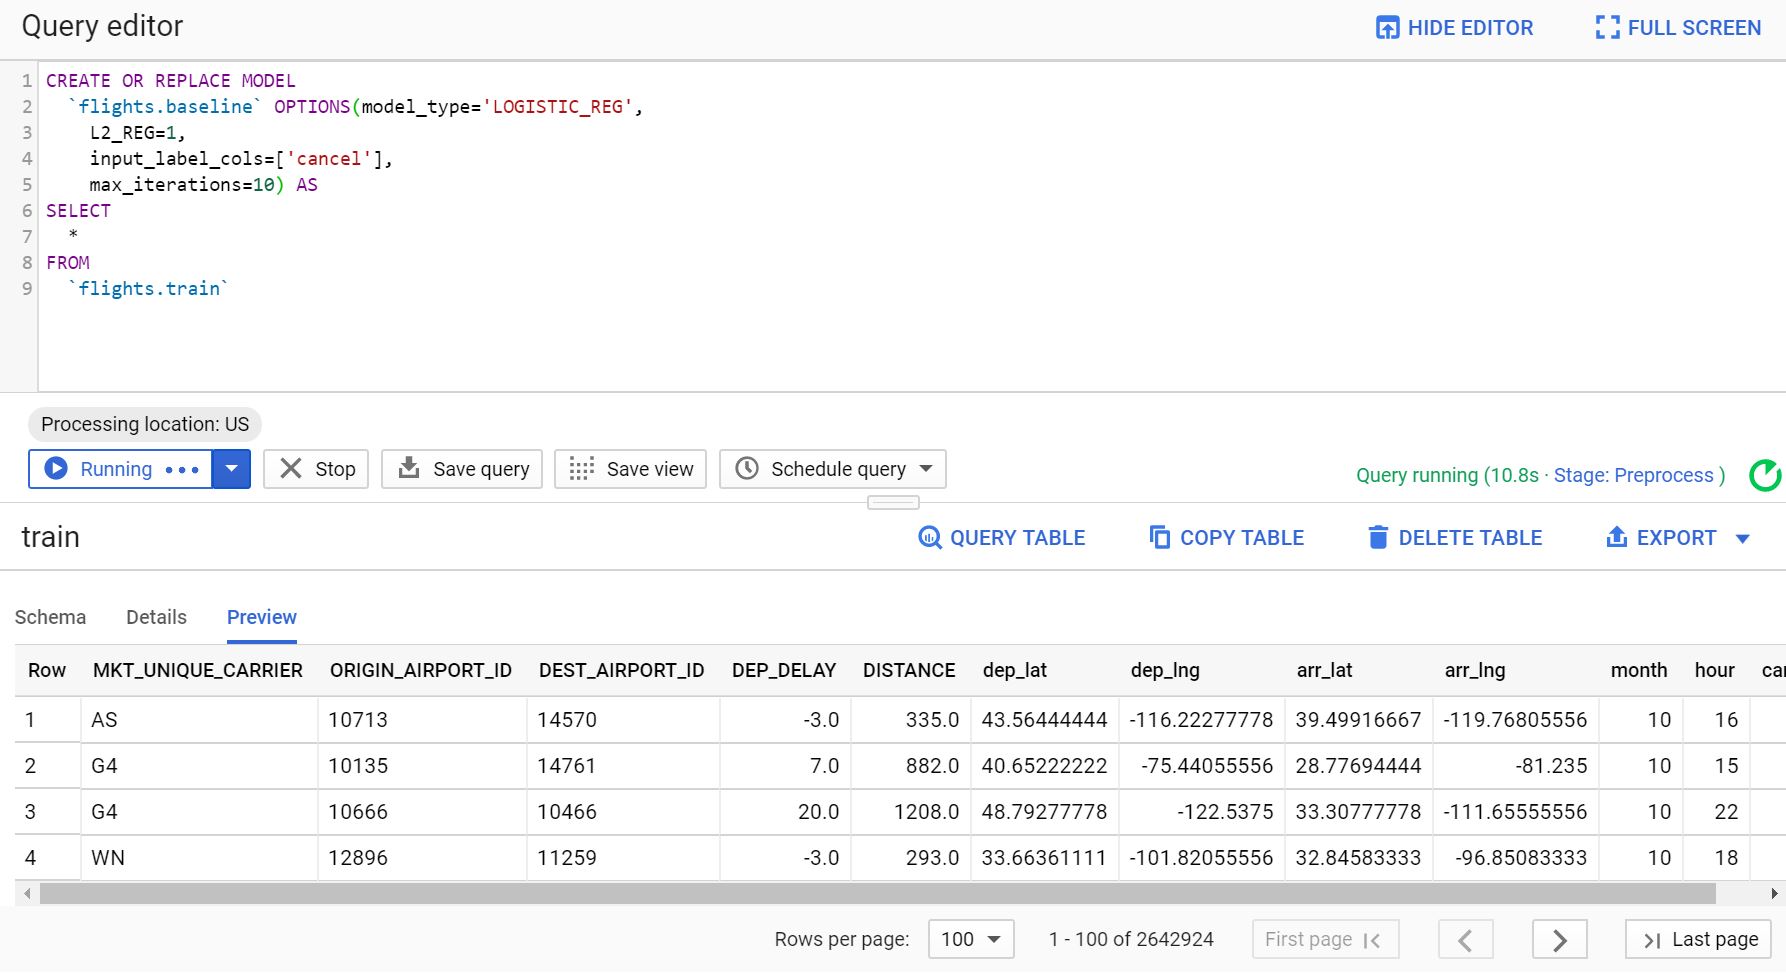
Bigquery is not just a tool providing essential SQL functions. I can build a logistic model here as a baseline for my future sophisticated deep learning model.
I used the “rand()” function to sample the training dataset, evaluation dataset, and test dataset. Oh, don’t forget as common sense in machine learning – it’s essential to have balanced negative and positive samples in the training data, i.e., having a similar amount of “cancel” data and “non-cancel” data. Then, I can use the ML training function in Bigquery to train the first basic model for this dataset and see its performance.
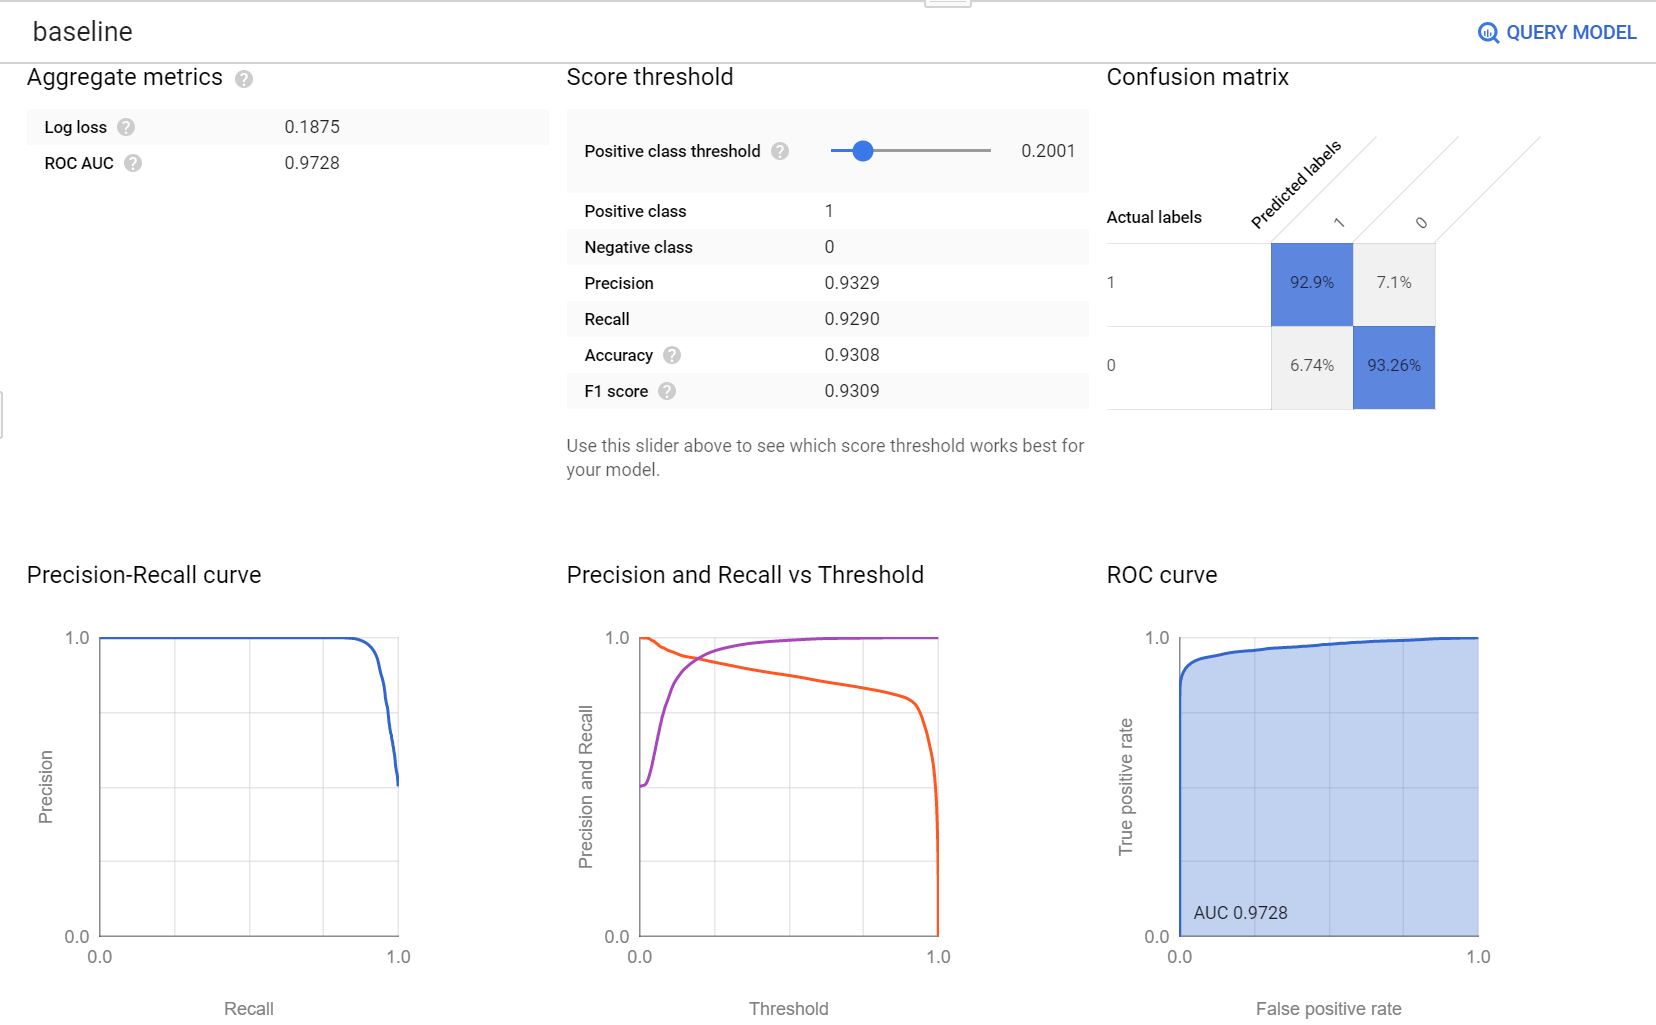
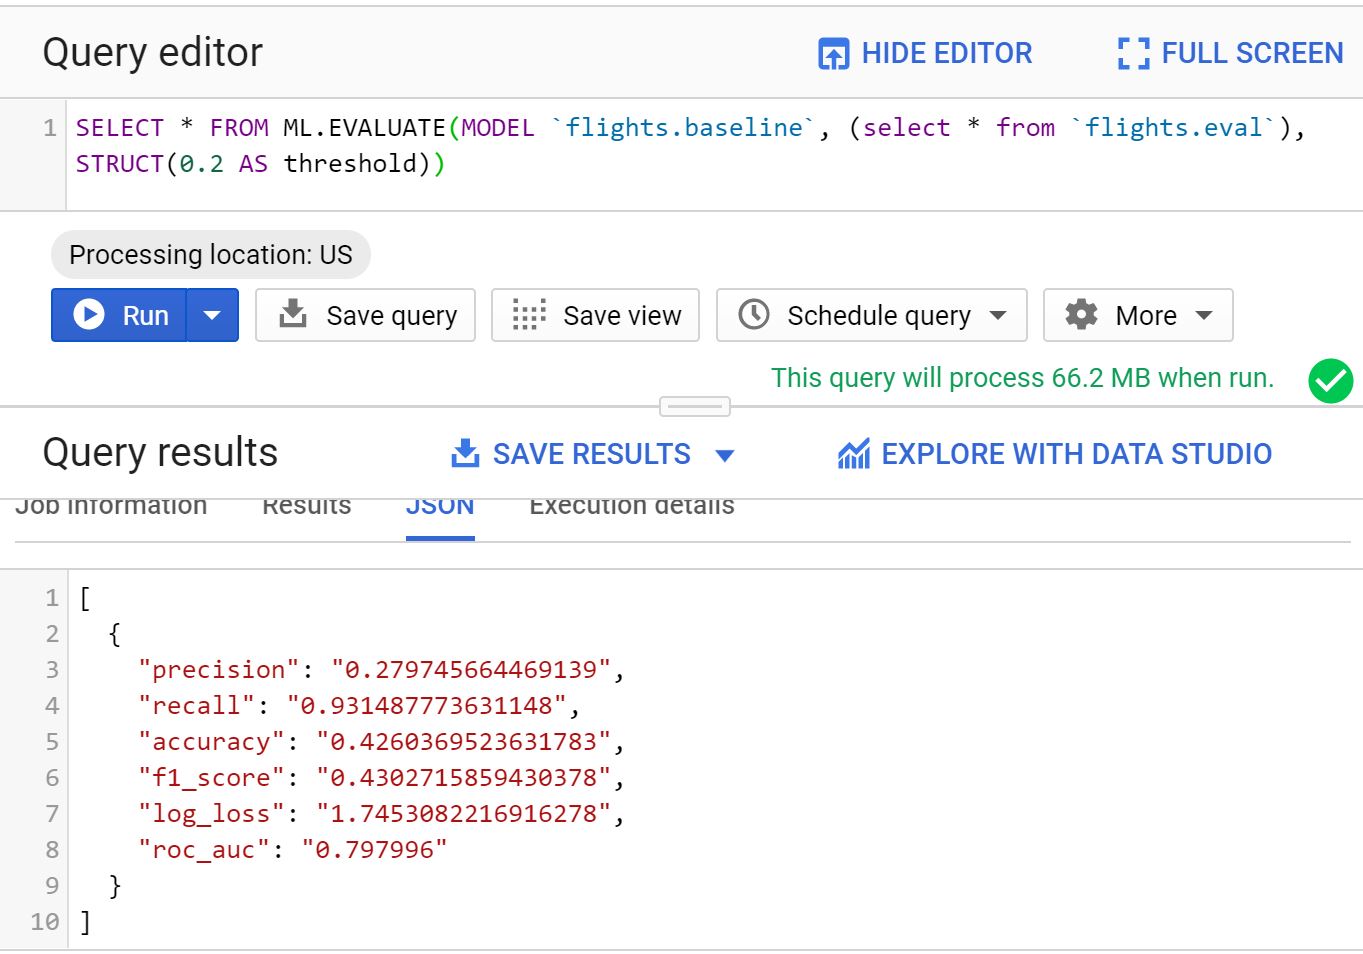
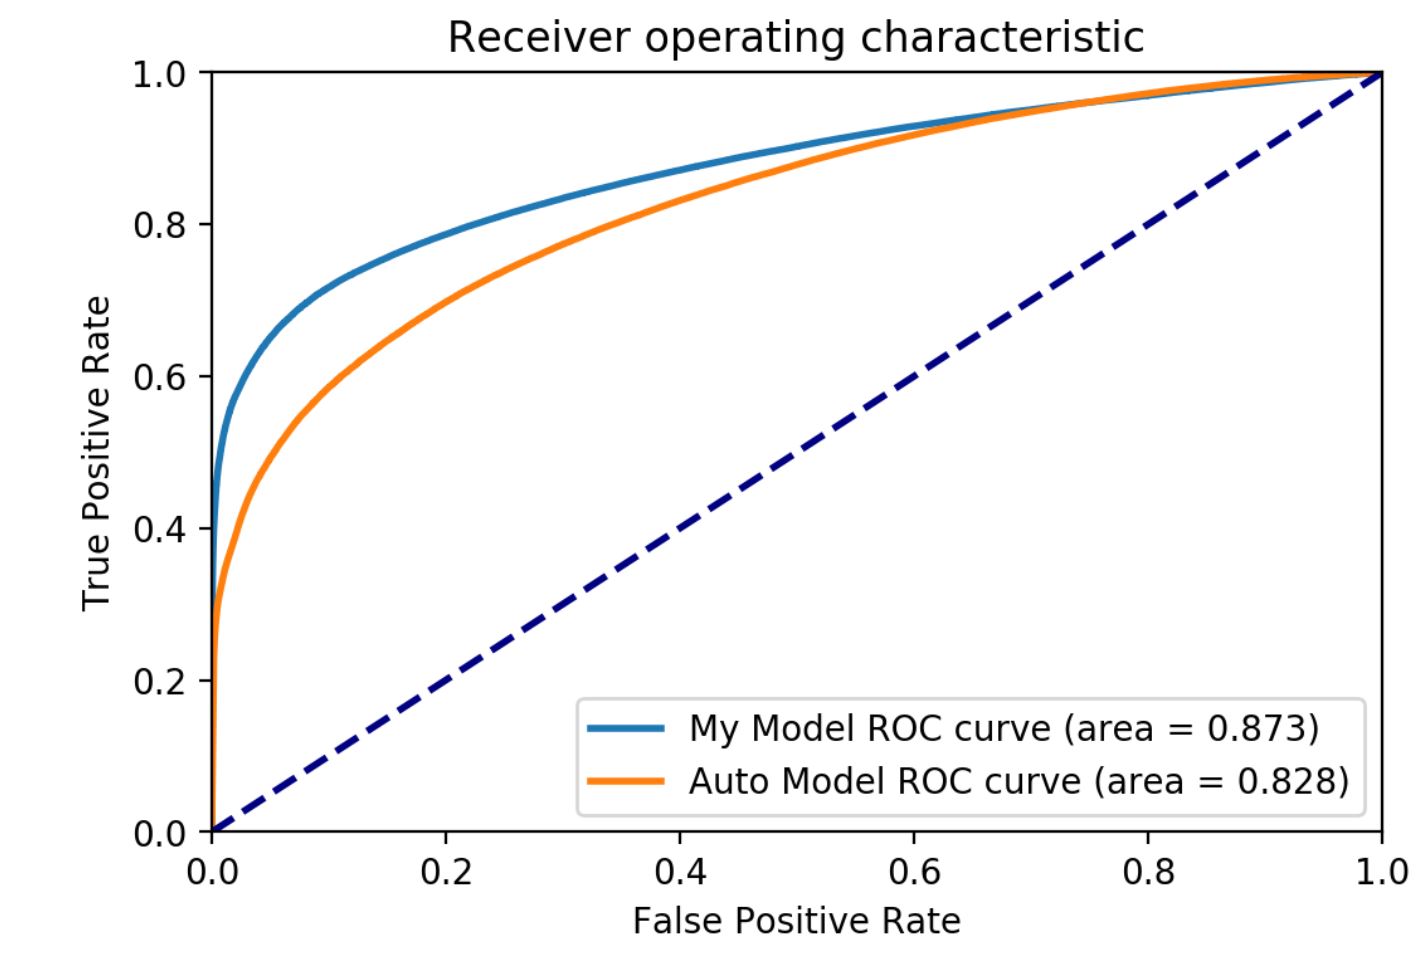
Don’t be fool by the training result, and the below is the real evaluation performance. Nice, the logistic model can achieve AUC around 0.798. And it’s the baseline I need to break.
Model Training
In this part, I trained four types of models and deployed the best. Below is the diagram of this part.
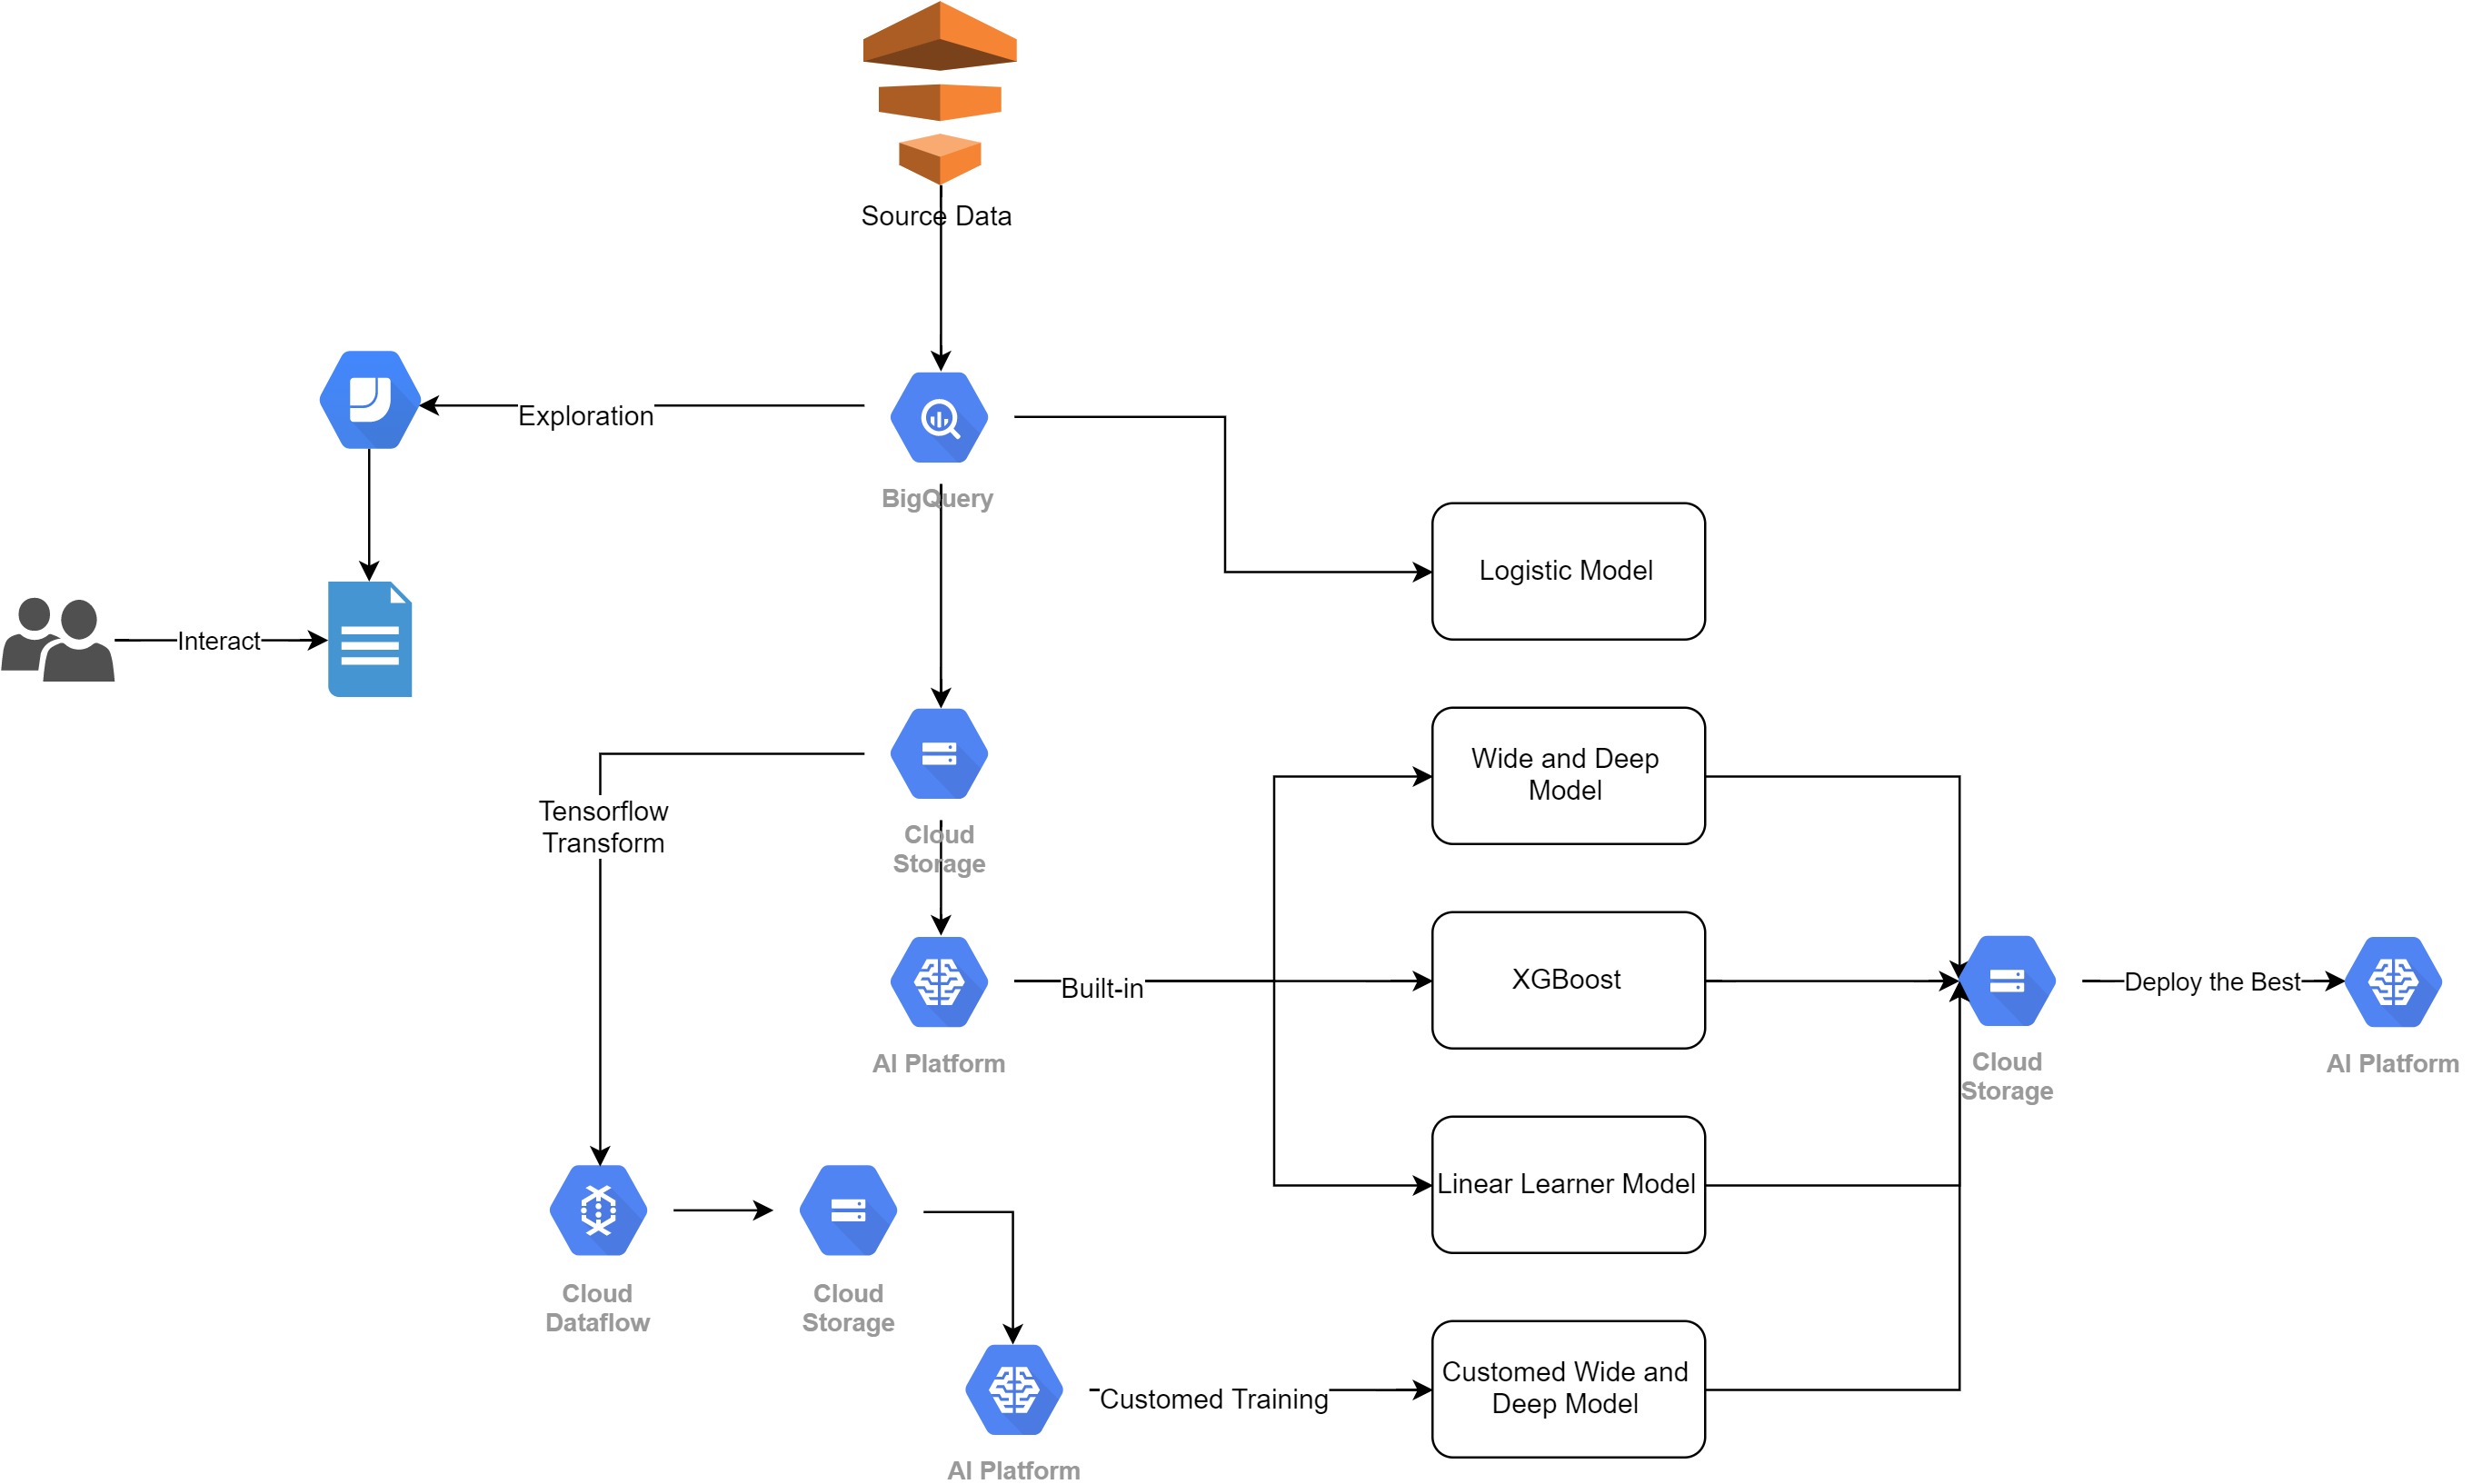
To train a machine learning model, I think, is just like cooking. If there is a recipe, I should try the existing recipe first. To reinvent pizza is not fun, and the new pizza may not as tasty as the “experienced” pizza. In the AI Platform, there are three build-in algorithms, and I should try them first.
The three algorithms are XGBoost, wide and deep model, and linear learner model. XGBoost tree is a kind of traditional machine learning model. Like random forest tree, it’s based on decision tree ensembles, which combine the results of multiple classifications and regression models. The wide and deep model combines a linear model that learns and “memorizes” a wide range of rules with a deep neural network that “generalizes” the rules. A linear learner model assigns one weight to each input feature and sums the weights to predict a numerical target value. See more details.
Their final evaluation results are compared as follows. Strangely, this final evaluation in logging for build-in algorithms seems only to use part of the evaluation data. As a result, I have to evaluate the best built-in models by using all the evaluation data.
| Type | Final AUC Evaluation |
|---|---|
| XGBoost | 0.865 |
| Linear learner model | 0.923 |
| Wide and deep model | 0.961 |
The wide and deep model performs the best here. Now, it’s time to write my code and see whether I could beat Google’s automation.
Luckily, mine is better than Google’s automatic data processing and model creation.
Here, we can do model examinations to know the model’s pros and cons and then can “targeted” refined the model. For example, use the What-if tool. However, from my experiences, this tool is not friendly with the AI Platform. Also, it’s not directly related to GCP. So, I skip this part.
Then, it’s time to deploy the model.
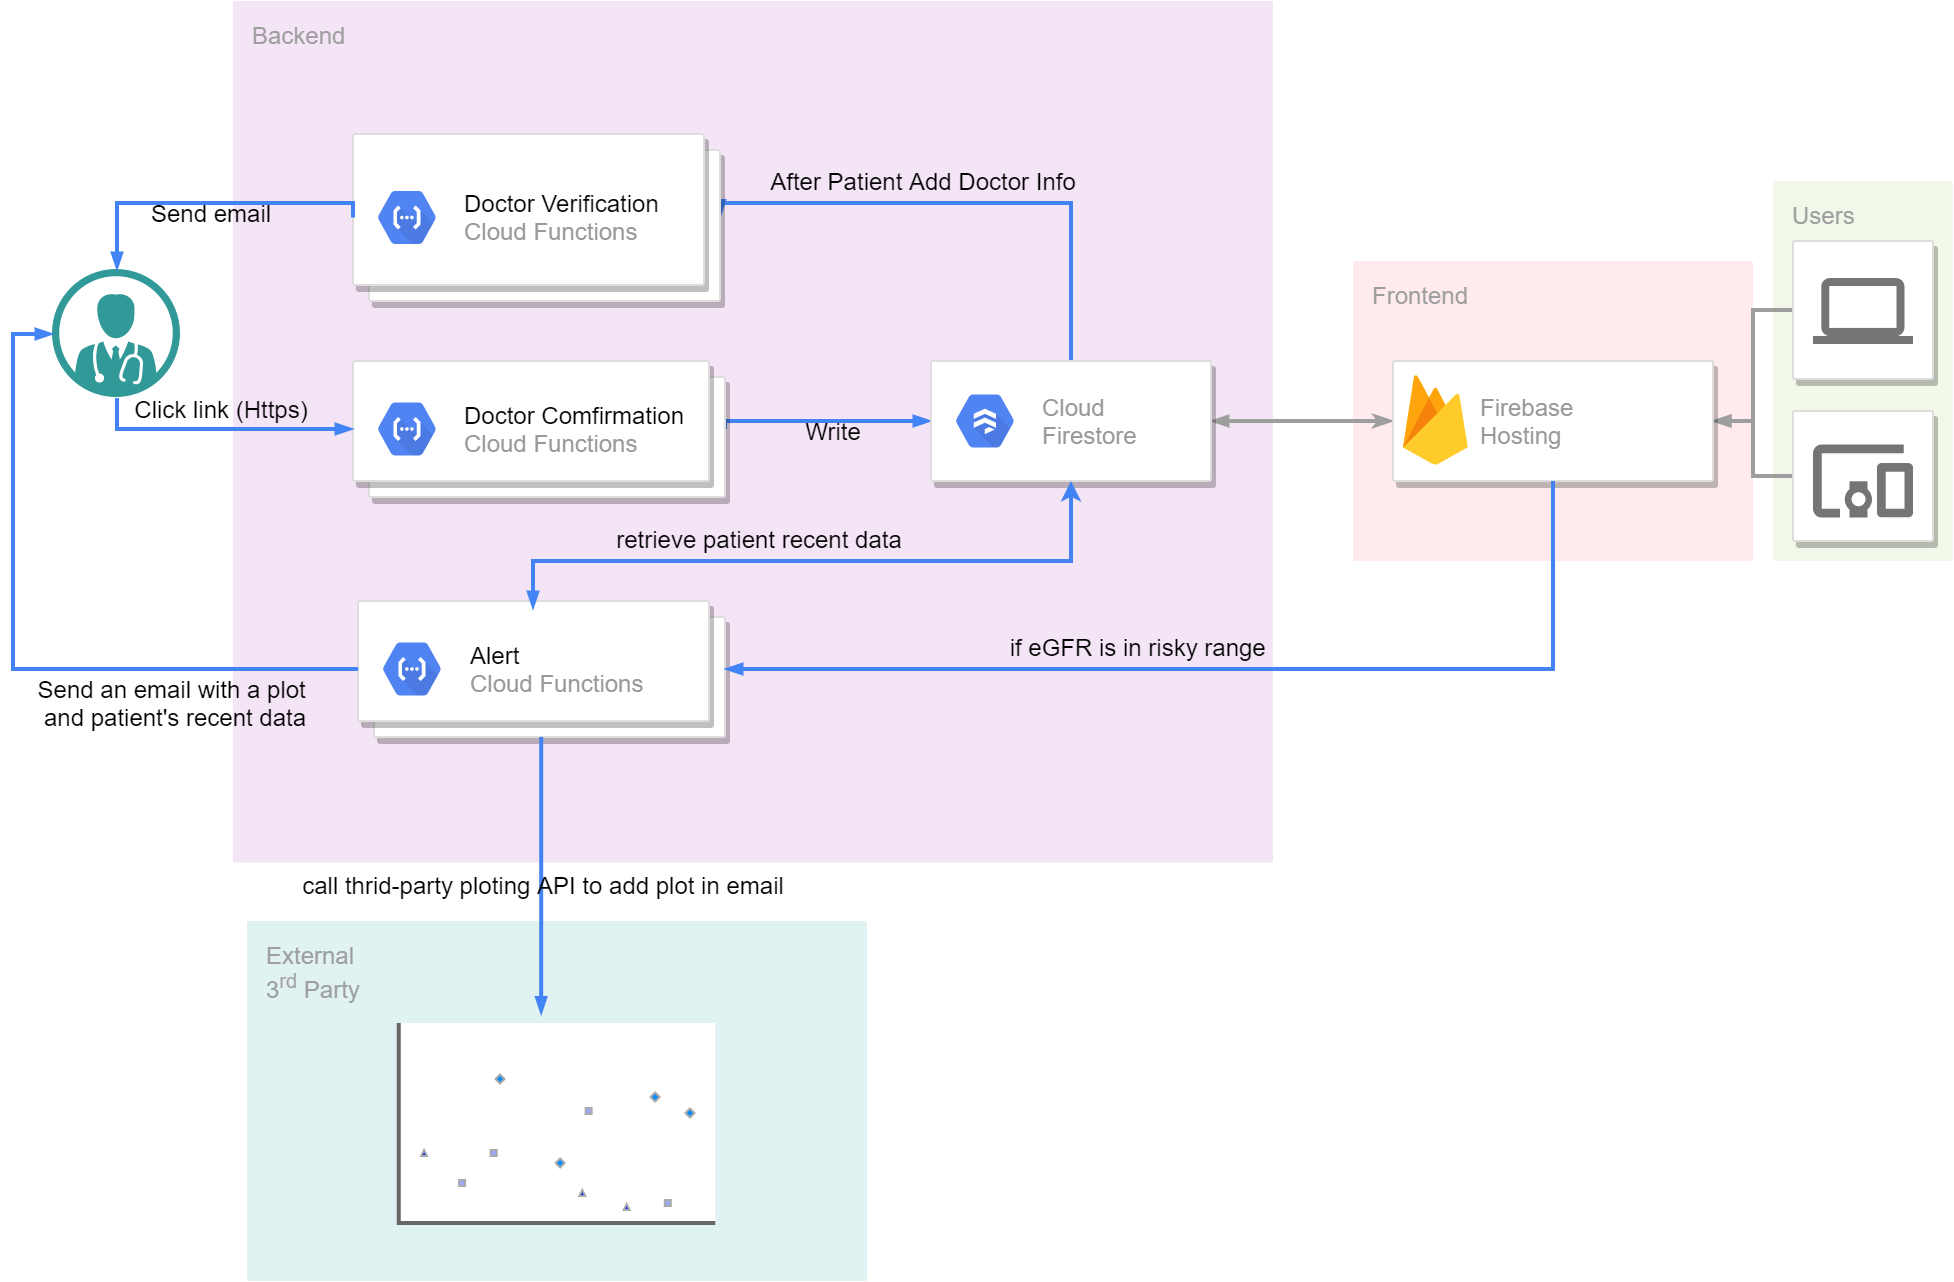
Model Deployment
In this part, I used the Google Sheet as the platform and AI-platform as the backend to deploy my model. Below is the diagram of this part. And the idea of using Google Sheet in this way is from “How to Grow a Spreadsheet into an Application, Google Next 2019“

As mentioned in one of my previous posts, here come at least three solutions.
First, simply click the “Deploy Model”. Then GCP will deploy it on ML engines and handle all the other processes. Second, you can deploy the model by yourself, and using docker to make the model service containerized is the option. It’s super fast to write a Dockerfile based on TensorFlow Serving and use Google Build to wrap the model into a container and deploy it to Kubernetes. Last, to achieve full DIY, you can choose to use a VM and do what you want. In this case, you have to set the networking forwarding rules, safety rules, etc..
For simplicity, I selected the first option. Here, it’s worth to notice that to invoke a model deployed on Google ML engines, a role for “ML Engine Developer” is needed. A helpful practice is to create a server account with this role and grant this server account to a microserver on Google Functions.
I chose Google Sheet as the platform to create a demo APP. Google Sheet has the database, UI, security, and loads of built-in APIs. To match this platform, I used Google Forms as the APP UI.
Wrap Up
Let’s wrap up with the whole structure.
Better Solutions I know now
Convert the model as Tensorflow.JS and deploy it on the client-side to achieve zero maintenance cost.
Use Flutter or Angular to write a more beautiful and customized UI.